JWT, “jot”
What does it stand for? Well, a JSON Web Token (JWT) is another acronym containing another acronym. JSON stand for “JavaScript Object Notation”. So JWT actually means “JavaScript Object Notation Web Token”. You can’t make these things up folks! Created by the IETF (Internet Engineering Task Force) and first published in 2010 as an RFC (Request For Comments). RFC 7519 is the current version, last changed in 2015. Here is the link directly to the source.
JWT’s are used for authorization, after a user has been authenticated (such as with a username and password). After that authentication, the JWT is issued. The JWT is used for authorization. Meaning, the user is authenticated by some other mechanism and now the JWT is used to let the server know what the user is authorized to access. The JWT is often used for “single sign on”.
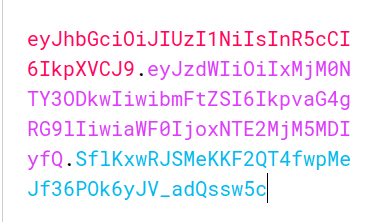
Sounds complicated! But you probably use JWT’s daily without even knowing it. Also, most people just say “JWT” or “JSON token” but the RFC actually suggests you can pronounce it as “jot”. I have not heard it used this way on any youtube tutorial, so maybe not the best thing to bust out during an interview. Below is an actual token.
eyJhbGciOiJIUzI1NiIsInR5cCI6IkpXVCJ9.
eyJzdWIiOiIxMjM0NTY3ODkwIiwibmFtZSI6I
kpvaG4gRG9lIiwiaWF0IjoxNTE2MjM5MDIyfQ.
SflKxwRJSMeKKF2QT4fwpMeJf36POk6yJV_adQssw5c
And below is what a JWT actually looks like, color coded to show what each part is. This is taken from an awesome tool at jwt.io which you should bookmark! You can past in your own JWT and decode it. Plus they have awesome articles on it.
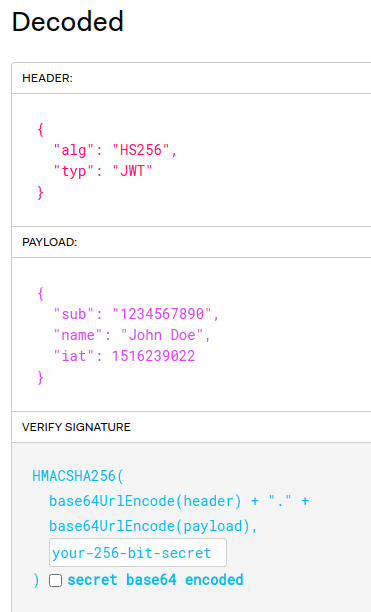
And here it is decoded, as you can see it has three parts: Header, payload, and signature
What is it?
JWT is an open standard for transmitting a JSON object securely between two computers. The information is digitally signed using HMAC, ECDSA, or RSA to name a few. JWT’s can be sent encrypted (even though HTTPS carrying the tokens already is) or signed. Signed just means you are able to verify the token contents were not modified, one user signs it using their private key (of a public/private key pair) and the recipient uses the public key to verify. Most use cases see JWT’s being used for authorization. For example, you log onto a site with your username and password how does the site know to keep you logged on? Instead of asking you for your username and password every time you request a new protected resource from it? JWT’s are one way of doing this!
How are JWT’s sent?
JWT’s are issued to a user after authentication by the server to the client. Each time the user makes a request (say to your API) your JWT is sent along, and the API can determine if you are allowed access based on the token. Though RFC 7159 does not mention it, JWT’s in practice are almost always sent via HTTPS.
Not encrypted!
Remeber, JWT’s are Base64 encoded and signed. Anyone can decode and read a JWT if they are able to get it.
JWT parts
Typically a user would make a request, such as logging on, through a browser. The request would get sent over over HTTPS to an API on the server. The API verifies the login information, authenticating the user, and creates a JWT with a secret that only it knows. It sends the JWT back the the user over HTTPS. The user receives the token, and places it in local storage. Now each time the user makes a request to that server, the JWT is attached. So a GET request would have the JWT attached as part of the header. The server would receive the new request, and decrypt the JWT to see if the user was allowed to access the resources. The JSON token contains three parts: A header, a payload (usually the user ID) and finally the signature.
- Header: Contains the algorithm that you are using to encode and decode the token with (such as HS256, SHA256, RSA etc) and the type (JWT). It is Base64Url encoded.
-
Payload: All the information stored in the token, usually the user ID. Called “claims”, there are three types: Registers, Public, Private.
- Registered claims: Not mandatory but recommended data. Such as sub (subject) and iss (issuer).
- Public claims: You can make these up!
- Private claims: Custom claims created between two different groups that decide what they use beforehand
The payload is also Base64Url encoded after creation
- Signature: To create the signature you first must have both the Base64Url encoded header and footer. On these you will use your secret (something you can makeup) which is then used along with your algorithm to make a HASH which is now the signature. The algorithm used to HASH it might be HMAC or SHA256, you can pick.
The signature is the really key part of this whole rodeo. Because you used a secret item along with your HASH algorithm, if a single item on either the header or payload is added, changed, or removed, running the HASH algorithm again on the header and payload along with your secret key will produce a totally different HASH that does not match the signature. Remember, the server does not store the signature at all, it just creates it and sends it out with the token. When the server receives a token from a client, it simply uses it’s stored secret key along with the header and payload, uses it’s HASH algorithm on that. If the resulting HASH is different from the signature of the token, the server will be able to easily tell if the header or payload has been modified when receiving it from a client.
If the client somehow did get the secret key from the server, they could create fake tokens. So your secret key is very important!
JWT alternative?
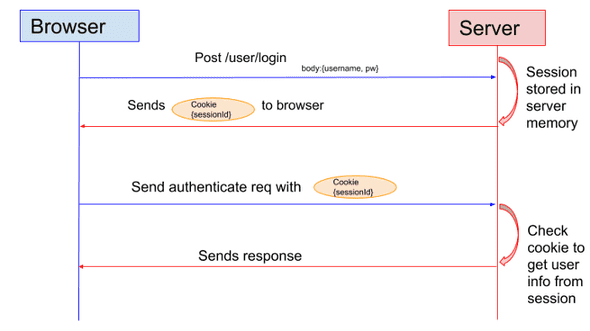
Normally session ID’s, stored in the browser cookies. After the user logs in the server creates a session and stores it on the server, and also sends the session ID back to the user. The user sends the cookie back to the server with each request, and the server checks the session cookie to see if it has that session stored and if so allows access.
My code, real life case
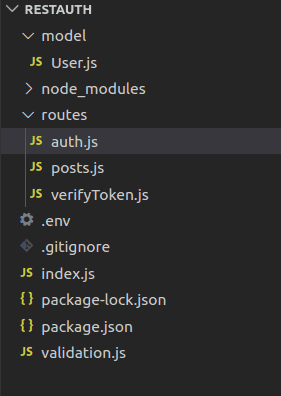
Here is a simple Nodejs app, using express and mongoose. This is a basic REST API which can register a user, and let them log in. It uses MongoDB for the database, and bcrypt to salt and hash passwords. Another NPM package, “jsonwebtoken” is installed to handle the JWT creation. Over 4 million weekly downloads. Express and Mongoose are used as well. Express to make requests more simple, and Mongoose to do the schema/data model creation for the MongoDB database. Here is a photo of my file structure:
There are two routes I created, one goes to /api/user/ and the other to /api/posts. The /api/user/ route is hit when a user tries to login or register, and splits off into either register or login. The login handles the authentication, hashing the password and checking to see if it matches the database. If it does, a JWT is sent back to the user. The /api/posts/ route is hit when trying to access any protected resource, and it is where the JWT is checked.
The below block covers the Nodejs entry, index.js. It connects using Mongoose to the MongoDB database, and uses express for routing.
///index.js file

const express = require("express");
const app = express();
const mongoose = require("mongoose");
require("dotenv").config();

////Import Routes
const authRoute = require("./routes/auth");
const postRoute = require("./routes/posts");
console.log(postRoute);
///Connect to database with Mongoose
mongoose.connect(
  `mongodb+srv://${process.env.DB_USERNAME}
:${process.env.DB_PWORD}@cluster0.1hf7x.
mongodb.net/${process.env.DB_NAME}
?retryWrites=true&w=majority`,
  { useNewUrlParser: true, useUnifiedTopology: true },
  () => console.log("Connected to the MongoDB")
);

///Middleware
app.use(express.json());

///Route Middlewares
app.use("/api/user", authRoute);
app.use("/api/posts", postRoute);

app.listen(3000, () => console.log("Server is UP!"));
Below is the route taken if the user requests /api/posts/, notice the “verify” as the middle parameter on get? That is a function which handles JWT verification.
/// /routes/auth.js


const router = require("express").Router();
const verify = require("./verifyToken");

router.get("/", verify, (req, res) => {
  res.json({ posts: { title: "What", description: "Secret data" } });

});

module.exports = router;
Below is where we check for and verify the the token if one is attached. The require at the top is for for an NPM package, “jsonwebtoken” which handles the creation and checks to see if they are valid. The verification function takes in the get request (req) received by the server. It checks the req header to see if it has a field called “auth-token”. If it does not, it returns a 401 “Access denied message” and it ends there.
However, if there is a header attached with the “auth-token” field (can be called anything) the function uses the jwt package to see if it is valid. const verified = jwt.verify(token, process.env.TOKEN_SECRET).
Here the header token sent from the client is checked. The attached token (taken from the get request sent by the client) has it’s header and payload used by the HASH algorithm along with your secret and the resulting HASH compared to the attached token signature.
/// /routes/verifyToken.js


const jwt = require("jsonwebtoken");

module.exports = function (req, res, next) {
  const token = req.header("auth-token");
  if (!token) return res.status(401).send("Access DENIED");
  console.log("mytoke", token);

  try {
    const verified = jwt.verify(token, process.env.TOKEN_SECRET);
    req.user = verified;
    next();
  } catch (err) {
    res.status(400).json({ token });
  }
};


